Let’s have a moment of honesty, shall we? When someone describes nail art as “stylish,” what they usually mean is “expensive-looking without actually requiring me to sell my furniture to afford it.” And THAT, my friends, is exactly the energy we’re channeling today.
Stylish manicure ideas dots are the secret weapon of people who want nails that look like they belong on a fashion editor’s Instagram without the fashion editor’s salary.
The word “stylish” gets thrown around a lot in the nail world. Every design claims to be stylish. Every trend promises sophistication.
But true stylishness — the kind that makes people do a double-take and then a triple-take and then quietly ask where you got them done — comes from a specific combination: interesting technique + wearable color palette + that indescribable “I know what I’m doing” energy. And dot nails, when done with intention, deliver all three in spades.
Here’s the relatable struggle we’re solving: you want nails that impress, but you also need them to work in real life. Not just for photos. Not just for special occasions. For ACTUAL living — typing, cooking, parenting, existing.
Stylish manicure ideas dots are the answer because they look elevated in any context. Boardroom? Stylish dots work. Brunch? Stylish dots work. Running errands in leggings and a messy bun? Stylish dots somehow make even THAT look intentional.
What makes dots specifically stylish is their inherent graphic quality. Dots are a design element. They appear in high fashion, in fine art, in architecture, in branding. When you wear dots on your nails, you’re participating in a visual language that extends far beyond nail art.
You’re referencing polka dots on vintage Chanel, pointillism in Seurat paintings, bubble patterns in contemporary sculpture. Your nails become part of a larger design conversation, and that’s inherently sophisticated.
This season, stylish dots are everywhere in the fashion world. Designers are incorporating dot motifs into collections. Magazines are featuring dot nail editorials. Celebrities are showing up to events with dotted manicures that look simultaneously playful and expensive. The trend is undeniable, and it’s remarkably accessible.
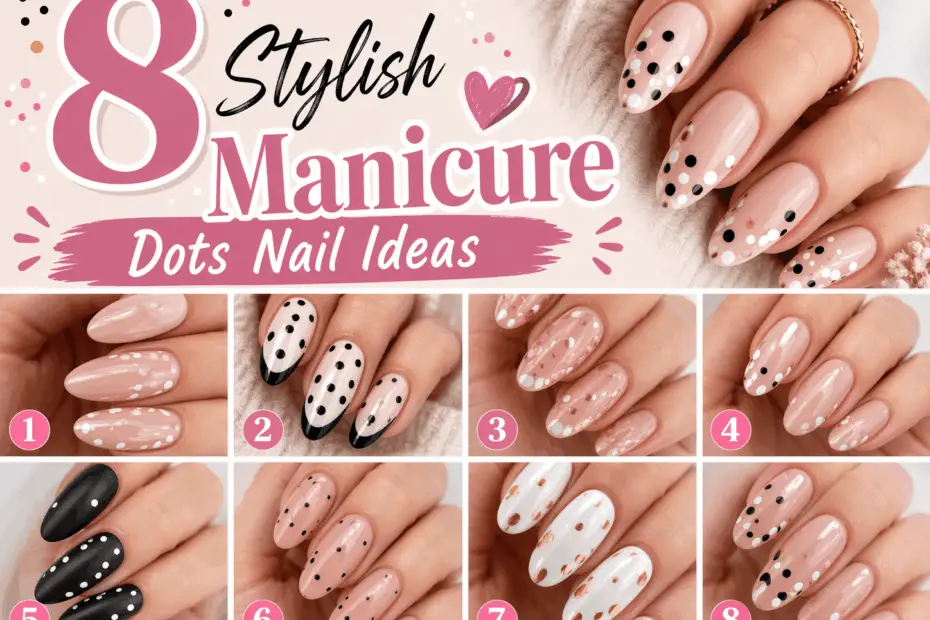
I’ve curated 8 stylish manicure ideas dots that range from subtly chic to boldly editorial. Each one strikes that perfect balance between “interesting enough to notice” and “wearable enough to live in.” Let’s elevate your dot game, queen. Let’s get STYLISH. ✨
1. Tortoiseshell Dot Overlay (That Makes Your Nails Look Like Luxury Accessories)
Imagine your hand reaching for a designer handbag, or perhaps adjusting a pair of oversized sunglasses. Your nails feature a warm, translucent base in honey and amber tones, overlaid with irregular clusters of tiny dots in brown, black, and gold. The effect mimics tortoiseshell patterning — that mottled, organic, expensive-looking texture found on vintage sunglasses and luxury hair accessories. It’s giving “I collect antique compacts and I have strong opinions about espresso.”
Tortoiseshell dot overlays are the stylish manicure ideas dots that made me understand “expensive” doesn’t have to mean “gold and diamonds.” It can mean “texture that references luxury materials.” The tortoiseshell pattern has been a symbol of sophisticated style for decades, and translating it into dot work creates a manicure that feels both vintage and current simultaneously.
The technique involves layering dots in warm browns, ambers, and blacks over a translucent base, creating the mottled, organic pattern that defines tortoiseshell. No two nails look exactly alike, which is part of the charm — real tortoiseshell (the ethical vintage kind, obviously) is naturally irregular, and the dot technique honors that organic variation.
This design is currently trending because “quiet luxury” and “old money” aesthetics are dominating fashion conversations. People want things that look inherited rather than purchased. Timeless rather than trendy. The tortoiseshell dot overlay delivers that energy — it looks like something that’s been in your family for generations, even if you got it done yesterday at the salon around the corner.
I wore tortoiseshell dots to a dinner party where I knew literally no one, and THREE different people asked if my nails were “some kind of special material.” When I explained they were just polish and dots, the reactions ranged from disbelief to immediate note-taking for their own nail appointments. That’s the stylish flex — looking so expensive that people assume you’re using materials they haven’t heard of.
How to Style It:
- Polish shade: “Honey” by Essie for the base, “Little Brown Dress” and “Licorice” for the dots, “Good as Gold” for accents. The key is warm, amber-to-brown color family that feels vintage and rich
- Application technique: Apply a sheer honey base, then use a small dotting tool to place irregular clusters of brown and black dots. Don’t space them evenly — tortoiseshell is organic and mottled. Hack: use a toothpick to slightly drag some dots while they’re still wet, creating elongated shapes that read as “shell texture” rather than perfect circles
- Complementary accessory: Wear actual tortoiseshell accessories — vintage sunglasses, hair clips, or jewelry. The coordination between nails and accessories creates a “theme” that feels incredibly intentional and expensive
- Difficulty level: Looks hard AF but trust me, you’ve got this. The irregularity IS the technique. There’s no “wrong” way to place tortoiseshell dots because nature itself is irregular. It’s very forgiving and very chic
📸 Picture This: You’re at a rooftop bar, golden hour light hitting your hands just right, and your tortoiseshell dot nails catch the warm light in a way that makes them glow like actual amber. Someone nearby assumes you must be someone important because your nails look like they cost a fortune.
2. Color-Blocked Dot Panels (That Turns Each Nail Into a Modern Art Composition)
Picture your hand flat on a white desk, fingers slightly spread. Each nail is divided into geometric sections — perhaps the left half is sage green and the right half is cream — and within each section, dots appear in the contrasting color. Sage sections have cream dots, cream sections have sage dots. The lines are clean, the colors are sophisticated, and the overall effect is graphic, bold, and completely contemporary. It’s giving “my nails have an MFA in graphic design.”
Color-blocked dot panels are the stylish manicure ideas dots for people who understand that “graphic” and “cute” are not mutually exclusive. This design takes the playful dot motif and executes it with architectural precision, creating nails that look like they belong in a design magazine spread rather than a nail art tutorial.
The color-blocking technique provides structure and intentionality, while the dots add warmth and approachability. Without the dots, color-blocked nails might feel too severe. Without the color-blocking, dots might feel too casual. Together, they create something that manages to be both serious and playful — the sartorial equivalent of a well-timed joke at a formal dinner.
This design is trending because color-blocking has made a massive comeback in fashion. We’re seeing it in clothing, in accessories, in interior design — clean sections of contrasting color that create visual interest through geometry rather than pattern. Applying that same principle to nails with dot details feels inevitable and brilliant.
I saw a version of this on a fashion editor at Fashion Week — sage and cream with delicate dot panels — and I literally stopped walking to stare. In a sea of elaborate, over-the-top nail art, these color-blocked dot panels stood out precisely BECAUSE they were restrained. They didn’t try to compete with the designer clothes; they complemented them. That’s true stylishness — knowing your role and playing it perfectly.
How to Style It:
- Polish shade: Pick two colors with good contrast but similar sophistication levels — “Mint Candy Apple” and “Blanc” by Essie for a fresh look, or “Chocolate Cakes” and “Mademoiselle” for something warmer and more autumnal
- Application technique: Use striping tape to create clean color-block sections, paint each section, remove tape while polish is still slightly wet, then add contrasting dots using a medium dotting tool. Hack: if striping tape feels too fiddly, use regular tape cut into thin strips. The key is pulling the tape OFF while polish is tacky for the cleanest edge
- Complementary accessory: Wear color-blocked clothing to match! A sweater with clean color sections, or a bag with geometric panels. The nails and outfit become a coordinated design statement that screams “I understand visual composition on a deep level”
- Difficulty level: Looks hard AF but trust me, you’ve got this. The tape does the hard work. You just paint inside the lines and add dots. It’s basically coloring for adults, and coloring is therapeutic AND stylish
📸 Picture This: You’re at a gallery opening, wine in hand, and someone asks if your nails were designed specifically to match the geometric abstract paintings on the walls. You say “no, but thank you for thinking I’m that conceptual,” and secretly vow to wear them to every gallery forever.
3. Metallic Dot Scatter on Matte Black (That Creates the Ultimate Light-and-Shadow Drama)
Visualize your hand emerging from the sleeve of a black cashmere coat, streetlights reflecting off your nails. The base is matte black — so matte it absorbs light like velvet — and scattered across that darkness are metallic dots in gold, rose gold, and bronze. The dots catch every available photon and throw it back in tiny, warm sparkles. The contrast is dramatic, luxurious, and giving “I arrive in limos and leave in legends.”
Metallic dot scatter on matte black is the stylish manicure ideas dots that I would wear to my own funeral if I could plan ahead that far. (Morbid? Maybe. But also, wouldn’t that be iconic? “Even in death, her nails were serving.” Anyway.) This design combines three powerful elements: the sophistication of matte black, the luxury of metallic accents, and the playfulness of scattered dots. The result is nails that feel expensive, edgy, and completely unforgettable.
The drama of this combination comes from contrast. Matte black is the ultimate neutral — it goes with everything, it says nothing, it absorbs attention rather than demanding it. But add metallic dots, and suddenly the matte base becomes a stage. The dots are the performers. The black is the spotlight. Together, they create a visual performance that happens every time you move your hands.
This design is particularly suited to evening events, but I’ve also seen it work beautifully in professional settings when the dots are smaller and more sparsely scattered. It adapts to context through scale. Large, dramatic dots for nightlife. Micro, subtle dots for daytime. Same concept, different volume. That’s versatility, and versatility is stylish.
I did this for New Year’s Eve with gold dots on matte black, and I felt genuinely underdressed even though I was wearing a sequin dress. THE NAILS OUTSHONE THE SEQUINS. That’s how powerful this combination is. When your nails compete with actual reflective fabric and WIN, you know you’ve achieved something special.
How to Style It:
- Polish shade: “Licorice” by Essie as the base, with a matte top coat. For dots, “Good as Gold” by OPI, “Penny Talk” for rose gold, and any bronze metallic you love. The warm metallics against cool black create the most satisfying contrast
- Application technique: Apply matte black base and let it dry completely. Use a small dotting tool to place metallic dots randomly across the nail. For evening, use 8-12 dots per nail. For daytime, use 3-5. Hack: apply dots in clusters rather than even scattering — three dots near the cuticle, two near the tip, one on the side. Clustered placement looks more intentional than uniform randomness
- Complementary accessory: Wear mixed metals — gold AND silver jewelry together. The mixed-metal trend pairs beautifully with multi-tonal metallic dots. Add a black blazer or coat for maximum “mysterious wealthy person” energy
- Difficulty level: Looks hard AF but trust me, you’ve got this. Matte polish is more forgiving than glossy because it doesn’t show brush strokes. Metallic dots are the easiest nail art element to place. The contrast does ALL the work
📸 Picture This: You’re at a candlelit dinner, reaching across the table for the wine, and your metallic dot scatter nails catch the flame in tiny golden flickers. The person across from you literally pauses their sentence to watch the light dance across your hands, and you pretend not to notice because you’re that stylish.
4. Nude Base with Strategic Dot Placement (That Proves Less Can Be Infinitely More)
Picture your hand adjusting a delicate gold necklace or perhaps signing a document with a nice pen. Your nails feature a perfect, skin-tone-matching nude base — so natural it looks like your nails but better. And placed at precise, strategic points on each nail are single dots or small dot clusters. One dot at the base of the ring finger nail. Three dots in a triangle on the pointer finger. Two dots near the tip of the middle finger. The placement varies nail by nail, creating an asymmetric, editorial pattern that feels intentional and artistic.
Nude base with strategic dot placement is the stylish manicure ideas dots at its most editorial and fashion-forward. This design understands that nude nails are classic, but nude nails WITH DOTS are a STATEMENT. The dots aren’t decoration — they’re punctuation. They’re emphasis. They’re the difference between “nice nails” and “who did your nails and can they do mine immediately.”
The strategic placement is what elevates this from “cute dots on nude” to “fashion editorial.” Each dot is placed with purpose. The asymmetry between nails creates visual rhythm — your eye moves from nail to nail, noticing the different placements, finding the pattern in the irregularity. It’s like visual jazz: structured but improvisational.
This design is having a major moment because “nude but interesting” is the holy grail of professional nail art. We all need nude nails for conservative environments, but we don’t want to feel BORING. Strategic dots solve that problem perfectly. They maintain the neutrality of nude while adding enough detail to keep things interesting. They’re the nail equivalent of a classic suit with unexpected lining.
I wore this to a job interview — nude base with tiny gold dots placed asymmetrically — and the interviewer commented on my nails within the first five minutes. Not in a “those are inappropriate for an interview” way. In a “those are stunning and I need to know where you got them” way. That’s the goal: nails that open doors rather than close them.
How to Style It:
- Polish shade: “Mademoiselle” by Essie or “Bare With Me” — the key is finding a nude that genuinely matches YOUR skin tone, not just a generic “nude” that’s actually beige
- Application technique: Plan your placement before you start. Sketch it mentally: which nail gets what? Use a tiny dotting tool and place dots with precision. Hack: use a toothpick dipped in polish for the most precise dot placement. The smaller the dot, the more “expensive” it reads
- Complementary accessory: Wear gold jewelry that echoes the dot placement. If you have a dot near your cuticle, wear a ring on that finger. The jewelry and dots create a visual relationship that feels incredibly considered
- Difficulty level: Looks hard AF but trust me, you’ve got this. The nude base is forgiving, and the dots are small enough that slight placement variations read as “artistic” rather than “mistaken”
📸 Picture This: You’re in a meeting, hands clasped on the table, and a colleague across from you keeps glancing at your strategic dot nails with professional admiration. After the meeting, they pull you aside and ask for your nail tech’s contact info because “those are the most sophisticated nails I’ve ever seen in a boardroom.”
5. Double-Dot French Tips (That Updates the Classic French With Graphic Precision)
Imagine your hand holding a champagne flute at an engagement party, celebrating someone else’s love while your nails quietly celebrate your own excellent taste. Instead of a traditional white French tip, your nail edges feature two parallel rows of tiny dots — one row of white dots, one row of gold dots, creating a dotted double-line that replaces the classic smile line. It’s familiar but new. Traditional but twisted. The French tip your grandmother would recognize, but updated for a generation that knows what “aesthetic” means.
Double-dot French tips are the stylish manicure ideas dots that prove classics can evolve without losing their essence. The French manicure has been around since before most of us were born, and it’ll outlast us all. But that doesn’t mean it can’t be REIMAGINED. The double-dot French tip takes everything we love about the classic — the structure, the elegance, the versatility — and adds a contemporary detail that makes it feel fresh and intentional.
The two rows of dots create a rhythm that the single solid line of a traditional French tip can’t match. There’s movement in the double-dot design. A visual beat. Like music for your nails. The spacing between the dots creates negative space that breathes, while the repetition of the pattern creates consistency that satisfies. It’s design theory applied to nail art, and the result is both intellectual and beautiful.
This variation is particularly popular among people who work in creative or fashion industries because it reads as “I respect tradition but I’m not bound by it.” It signals taste and education — you know what a French tip is, you understand its history, and you’ve chosen to evolve it. That’s a specific kind of stylishness that only comes from genuine understanding.
I did double-dot French tips in white and silver for a wedding and felt like the most elegant guest there without trying to upstage anyone. (Okay, I might have slightly upstaged the centerpieces, but the bride’s nails were ALSO done, so it was fine.) The design photographed beautifully, worked with my outfit, and sparked multiple conversations about “where did you get that idea?” The answer, as always: Pinterest, 2 AM, no regrets.
How to Style It:
- Polish shade: “Ballet Slippers” by Essie for the base, “Blanc” for the first dot row, “Good as Gold” for the second. Or reverse it — gold dots closer to the tip, white dots closer to the nail. Play with the order
- Application technique: Use French tip guides or tape to mark your smile line, then place two parallel rows of dots along that edge. Use a tiny dotting tool for precision. Hack: place all the dots in one row first, then follow the same curve for the second row. The first row acts as a guide for the second, making alignment much easier
- Complementary accessory: Wear classic pieces with modern twists — a vintage bag with a contemporary strap, traditional pearls with an edgy setting. The “classic updated” philosophy of the nails should echo in your accessories
- Difficulty level: Looks hard AF but trust me, you’ve got this. The French tip structure gives you built-in guidance, and two rows of tiny dots are easier than one perfect solid line. The dots forgive minor wobbles that a solid tip would expose
📸 Picture This: You’re at a formal event, hands visible in every photo because you’re holding a clutch or a glass, and your double-dot French tips appear in the background of someone’s candid shot. They zoom in later, post it to their story with “nail goals,” and you get to feel quietly legendary.
6. Holographic Dot Constellation (That Makes Your Nails Look Like They Belong in Space)
Picture your hand reaching for your phone at a dark concert or club, the stage lights hitting your nails in bursts of color. A sheer, barely-there base is covered in scattered holographic dots that flash rainbow colors with every movement. One angle they’re silver, another they’re purple, another they’re throwing off green and pink sparks simultaneously. It’s not glitter — it’s better than glitter. It’s controlled chaos. It’s starlight captured in dot form. It’s giving “I am ethereal and slightly unbothered by gravity.”
Holographic dot constellations are the stylish manicure ideas dots for people who want magic without messiness. Holographic nail effects have been popular for years, but combining them with dot work specifically creates something more refined than all-over holographic polish. The dots become STARS. The nail becomes SPACE. And your hand becomes a tiny galaxy that you carry around with you, which is honestly the most stylish thing I can imagine.
The controlled scattering of holographic dots — rather than full-coverage holographic polish — creates depth and intentionality. It looks like someone carefully placed each holographic element rather than just painting shimmer everywhere. That deliberateness reads as more expensive, more artistic, more “designed.” And in the world of stylish nails, “designed” is always better than “applied.”
This design works because holographic effects are inherently joyful. They trigger childlike wonder — “ooh, colors!” — but the dot application makes them feel grown-up. It’s the perfect balance of whimsy and sophistication. You can wear these to a music festival AND a business dinner, and they’ll work for both. That’s range, and range is stylish.
I wore holographic dot constellations to a friend’s birthday party at a bar with terrible lighting (fluorescent overheads, why do bars do this?), and my nails were LITERALLY the best-lit thing in the room. They caught the weak overhead light and transformed it into rainbow sparks. The birthday girl took a photo specifically of my hands. In HER birthday photos. That’s the power of good holographic dots — they steal attention even from birthday cake.
How to Style It:
- Polish shade: A sheer nude base like “Mademoiselle” by Essie, or clear if you want maximum holographic impact. For the dots, use holographic nail powder applied with a dotting tool, or holographic glitter polish if powder feels too advanced
- Application technique: Apply a no-wipe top coat, cure or let dry, then use a dotting tool to apply holographic powder to specific spots. Create “constellation” patterns — clusters of 3-4 dots, scattered singles, gentle arcs. Hack: if using holographic polish instead of powder, apply it with a tiny brush in dot shapes, then seal with top coat. The key is CONTROLLED holographic placement rather than all-over chaos
- Complementary accessory: Wear silver jewelry to echo the holographic base tones, or keep accessories minimal and let the nails be the only sparkle. Either approach works, but “holographic nails + minimal everything else” is peak editorial styling
- Difficulty level: Looks hard AF but trust me, you’ve got this. Holographic powder application is actually easier than precise polish placement because the powder forgives slight irregularities. Sparkle is nature’s concealer
📸 Picture This: You’re at a concert, phone flashlight waving in the air during the slow song, and your holographic dot constellation nails are catching every beam of stage light and turning them into personal rainbows. The person next to you literally stops singing to stare, and you feel like a nail art wizard.
7. Ombre Dot Fade Tips (That Creates a Gradient Using Only Dots)
Picture your hand flat, perhaps resting on a marble surface for an Instagram photo you’ll definitely post. Your nails start with a rich, saturated color at the base — maybe a deep teal or burgundy — and fade into a lighter shade at the tips. But instead of a smooth ombré, the fade is created entirely by dots. Dense, overlapping dots near the cuticle create the dark base. Sparsely scattered dots near the tips create the light finish. The middle ground is a gradual transition of dot density. It’s pointillism for your nails, and it’s absolutely mesmerizing.
Ombre dot fade tips are the stylish manicure ideas dots that made me realize ombré doesn’t need sponges or blending brushes. It just needs DOTS. Lots of them. Placed strategically. The density variation creates the gradient illusion, and the dot format adds texture and interest that smooth ombré simply can’t match.
The technique is genuinely fascinating: where dots are dense and overlapping, the color reads as solid and dark. Where dots are sparse and separate, the color reads as light and airy. The transition area — where dots go from dense to sparse — creates the fade. It’s optical mixing, the same principle pointillist painters used to create entire artworks from individual dots of color. Your nails become tiny Seurat paintings, and honestly? That’s incredibly stylish.
This design is trending because it combines two beloved techniques — ombré and dots — into one cohesive look that feels fresh rather than derivative. We’ve all seen ombré. We’ve all seen dots. But ombré MADE OF dots? That’s new. That’s interesting. That’s the kind of design that makes nail artists say “damn, why didn’t I think of that?”
I did an ombre dot fade in navy to white and felt like my nails were wearing tiny ocean waves. The transition was so gradual and satisfying that I couldn’t stop looking at them. My productivity definitely suffered that week because every five minutes I’d find myself holding my hand up to the light, watching the dot density shift from dark to light. Worth it.
How to Style It:
- Polish shade: Pick two colors in the same family — “After School Boy Blazer” by Essie for dark navy, mixed with “Blanc” for the light end. Or “Wicked” for deep red fading to “Muchi, Muchi” for soft pink. The key is enough contrast between dark and light for the fade to read clearly
- Application technique: Paint your dark base color, then use a dotting tool to place dots of your light color over it. Start sparse near the tips and get progressively denser toward the cuticle. For the densest area, place dots so close they nearly touch. Hack: use two dotting tools — one large for quick coverage in dense areas, one small for precise placement in sparse areas. The size variation adds texture to the fade
- Complementary accessory: Wear pieces that echo the ombré concept — a scarf with color graduation, or jewelry with gradient stones. The repetition of “fade” across your look creates cohesion that feels incredibly intentional
- Difficulty level: Looks hard AF but trust me, you’ve got this. The dot density does the blending for you. You don’t need to create smooth transitions — the eye mixes the dots automatically. It’s literally pointillism, and pointillism was invented to make painting EASIER
📸 Picture This: You’re at a beach, hand trailing in the water, and your ombre dot fade nails mirror the color transition of the ocean around you — dark near your hand, light toward the surface. Someone takes a photo without you noticing, and later you see it captioned “even her nails match the sea.”
8. Reverse Dot French (That Flips the Script and Puts Dots Where You Least Expect Them)
Picture your hand in a relaxed position, fingers gently curved. Instead of dots at the tips (where French tips usually live), your nails feature a solid color on the free edge — maybe a deep red or a sophisticated navy — and the area NEAR THE CUTICLE is dotted. Tiny dots create a “reverse smile line” at the base of the nail, framing the cuticle rather than the tip. It’s unexpected, it’s clever, and it’s giving “I know enough about nail conventions to break them intentionally.”
Reverse dot French is the stylish manicure ideas dots that proves rules are meant to be understood and THEN broken. This design takes everything we know about French manicures — tips are light, bases are natural, the smile line goes at the EDGE — and flips it. The dots are at the cuticle. The solid color is at the tip. The “smile” is inverted. And the result is so unexpected that people can’t help but be charmed by the subversion.
The cleverness of this design is its conversational quality. It invites dialogue. People see it and pause. “Wait, are those dots… near your cuticle?” they’ll ask. And you get to say “yes, it’s a reverse French” with the quiet confidence of someone who knows nail terminology. That exchange — that moment of shared discovery — is part of the design’s appeal. It’s not just nail art; it’s an icebreaker.
This variation is particularly suited to stylish environments because it signals knowledge and intentionality. Anyone can get a French tip. Anyone can add dots to a tip. But choosing to REVERSE the placement? That requires understanding the convention before breaking it. It’s the nail equivalent of a jazz musician playing a standard in an unexpected key. The expertise is in the subversion.
I did a reverse dot French in black with gold cuticle dots for a fashion event, and the number of “wait, what am I looking at?” reactions was genuinely delightful. People weren’t sure if they were seeing the design correctly, which made them look CLOSER, which made them appreciate the details more. Reverse placement: forcing engagement through confusion since… well, since I invented it just now, but still.
How to Style It:
- Polish shade: “Licorice” by Essie for a black tip, “Good as Gold” for the cuticle dots. Or “Russian Red” for tips with “Blanc” dots. The key is strong contrast between the solid tip and the dotted base area
- Application technique: Paint the tip area in your chosen solid color (use tape for a clean edge if needed), then use a tiny dotting tool to place dots along the cuticle line. Create a dotted “smile” that mirrors where a traditional French tip would be, but at the opposite end. Hack: use a reinforcement sticker (the round kind) placed near the cuticle as a guide for your dot curve. Remove it after dotting for a perfect semi-circle
- Complementary accessory: Wear something that also “breaks rules” — a blazer over a slip dress, sneakers with formal wear, mixed prints. The reverse nail philosophy should echo in your outfit choices for maximum “fashion insider” energy
- Difficulty level: Looks hard AF but trust me, you’ve got this. The solid tip is just… painting a tip. The dots near the cuticle don’t require precision because the cuticle itself provides a natural boundary. This is actually easier than a traditional French tip
📸 Picture This: You’re at a fashion industry party, holding a drink, and a well-known stylist notices your reverse dot French nails. They do a double-take, lean in, and say “that’s brilliant — who did those?” And you get to casually name your nail tech while internally screaming because a STYLIST complimented your nail art.
Final Thoughts
If you’ve made it through all eight of these stylish manicure ideas dots and you don’t feel at least 40% more fashionable than when you started, then I have failed you as a nail art guide and I sincerely apologize. But I don’t think I’ve failed, because these designs? They’re objectively stylish. They’re the kind of nails that get noticed by people who understand design. They’re the kind of nails that photograph well, work in real life, and make you feel like you have your life together even when you absolutely do not.
Here’s the truth about stylish dots: they prove that nail art doesn’t need to be elaborate to be impressive. It needs to be INTENTIONAL. A single perfectly placed dot on a nude base is more stylish than a cluttered, confused design with fifteen different techniques. Restraint is fashionable. Understanding is fashionable. And dots — simple, round, unpretentious dots — are capable of incredible sophistication when used with knowledge and care.
The 8 designs we’ve explored cover the full spectrum of stylish dot work: luxury textures, graphic compositions, dramatic contrasts, editorial placements, classic updates, magical holographics, artistic gradients, and clever reversals. Each one represents a different facet of “stylish,” but they all share the same foundation: dots used thoughtfully, placed intentionally, designed beautifully.
So here’s my challenge to you: choose the design that makes you feel like the most stylish version of yourself. Not the one that’s trending hardest. Not the one that got the most likes on Instagram. The one that makes YOU feel confident, sophisticated, and ready to take on whatever room you walk into. Because stylish isn’t about following rules — it’s about knowing yourself and presenting that self with intention.
Which stylish dot design is calling your name? Are you team tortoiseshell luxury or team holographic galaxy? Team color-blocked graphic or team reverse French cleverness? Drop a comment and let me know — I genuinely want to hear which design has you ready to book that appointment and elevate your entire aesthetic.
Your nails are waiting. Your most stylish self is waiting. And the world is waiting to notice. Go forth and dot with sophistication, queen. The stylish era starts now. ✨